

opheim
CCRX Supporter
For those more fond of PDFs, I have also made this teardown available as a PDF download. Click here to download.
Introduction
From an owners perspective

The JJ-CCR has been designed and tested since 2006 with more than 2000 operating hours under water in different locations around the world. In 2009 the unit was tested to the EN14143:2003 standard and in 2011 was rewarded with the official CE certification for diving depths of 40msw and 100msw.(1)
My unit is a non-CE version as I purchased it outside the EU. This was done intentionally as the BOV did not hold CE certification at the time of purchase. The BOV still does not hold CE certification, and is currently only available for purchase in the international edition.(2) This teardown is done with the BOV, unfortunately I didn’t have a DSV available for the photos.
The main differences from my unit to the CE unit is that the latter is shipped including 3-litre steel tanks, there’s a DSV instead of the BOV and the O2-side has M26 valve / regulator. Other than that, it’s the same unit.
JJ has made it easy to purchase the unit. You basically pick your edition (international with BOV or CE with DSV. If you choose the international edition, you have the option of buying a “light” edition, which just means “delivered without tanks”.
When you buy an Audi or BMW, you have litteraly hundreds of options and accessories. With the JJ, not so much. You can add a manual addition valve for the diluent side (O2 is standard), you can add a secondary Shearwater Predator computer (standalone) and you can choose the radial scrubber in addition to the standard axial. The radial scrubber holds 3.05kg as opposed to the axial which holds 2.3kg of Sofnolime. That’s it.
The JJ CCR has been very popular in Europe and Asia over the last couple of years, and according to my latest information, there is currently more than 300 units in use worldwide.(3) The unit is marketed as the “4x4 of rebreathers”, and sets out to be a simple, robust, adaptable and flexible rebreather when it comes to configuration. Suitable from lightweight recreational to the most demanding technical dives.
Let’s move on to a full teardown of the unit.
What’s in the box
The JJ is delivered in a crate, excellent for shipping or airtravel. Inside you’ll find the complete unit, fully assembled.
The unit comes complete with the aluminum body, stainless steel stand, head with electronics (hardwired Shearwater Predator and Shearwater HUD), loop with BOV (or DSV if buying CE unit), Apeks US4 1.stages, complete kit of hoses (miflex on LP, rubber on HP) and manifold, SPGs, backmounted counterlungs, wing, backplate with harness and the scrubber canister with two filter scrims. If ordered with tanks, you’ll get two 3L steel tanks with AP inline valves.

Original configuration with the standard wing, harness, backplate, regs, inverted tanks and all.

Dimensions
The canister itself is 43 cm high with a diameter of 18 cm. The rails and trimweight tubes comes in addition to this. The stand adds another 15 cm to the height. Then you put the handle on top, bringing the total height up to 67 cm when the handle is fully extracted.
Complete with a wing, backplate, harness, hoses and 3L steel tanks, with a full scrubber and 4kg leadrods in the canister tubes, the total weight ready-to-dive is around 37 kg.
The canister
The canister is made of aluminum, and the base has two delrin spacers that allows the stainless steel stand to be attached without issues with galvanic corrosion. This was not so on the early units, but has been rectified by JJ since then.

On the “backplate-side” of the canister, there are two tubes which can be used for trimweights. Users have come up with different solutions here, I myself had two custom lead rods fitted, coated with Plasti-DIP. They clock in at just over 4kg (total) and are perfect. The handle is screwed into these tubes, acting as covers.
On the outside of the canister, there are railings allowing you to fit up to four tanks to the unit, actually up to 12L steel tanks. This flexibility is one of the absolute pros of the unit. I normally dive with either 3L steel or 7L steel tanks, but have also tested it with 3L and S40 alu tanks. Some (many) divers will discover that having a 0.85L suitgas tank on the backplate (wreck mount style) may interfere with the inhale counterlung. The railings on the canister allows for the suitgas to be secured on the back instead.
From the factory, the unit is set up with inverted tanks, I have later switched around on the hoses to fascilitate deinverting the tanks in order to get the valves upright. This can actually be done without replacing any hoses (just by swapping where they go), but if you want it absolutely perfect, you may want to swap one or two.

7L steel de-inverted - 3L steel inverted - 3L steel de-inverted
Inside the electronics
On top of the head you’ll find the O2 inlet, a standard 9/16” M regulator connection. Opposite of this you find the piezo-button for the HUD. A tap turns it on, another turns it off. Three rapid taps in under a second calibrates it.

Dead center is the inhale hose, the one close to the edge is the exhale one. These have different diameter to avoid possibility of connecting them wrong. The other ends (which connect to the T-pieces) are threaded oppositely for the same reason.
On the sides of the exhale hose you’ll find the HUD cable and the Predator cable. Both of these are hardwired to the unit and can’t be removed (easily anyway).
Opposite of the exhale hose you’ll find the battery compartment. This is fastened with 10 screws which must be removed to gain access. In the compartment, which is sealed from everything else and is not in contact with the loop, you’ll find two 6V CR-P2 batteries connected in parallel which run the solenoid. In addition you’l find a 3,6V SAFT14500 battery which run the HUD. This is the same battery that you’ll find in the Shearwater Predator handset. The SAFT should outlive the two CR-P2’s by a mile, but JJ recommends swapping them all at the same time, normally they should all last at least 6-12 months. The two CR-P2’s are monitored by the Shearwater Predator which will give a “Low Battery EXT” warning if they need to be replaced.
Removing the head from the unit, you expose the interiors. The canister itself contains nothing, but underneath the head you’ll find the solenoid, three O2 cells and their connectors. The solenoid is a small, low power version. It is designed to have a fault mode in closed position if if fails. Due to this low power consumption, the intermediate pressure for the solenoid is set to 7-7.5 bar. (In contrast to the diluent side which is the normal 9-10 bar).

The cells used are Vandagraph-manufactured R17JJ-CCR cells which have proven to be very stable and deliver good response times.
Inside you’ll also see the sealing on the potted area for the electronics / circuit boards. This is not accessible for the user.
The HUD
The HUD on the JJ CCR is a Shearwater model. This is an “active” HUD, meaning it gives you the actual PO2, not just a “you’re good” or “you’re screwed” signal. The three LEDs indicate each individual cell, and can flash red, orange or green. One orange flash means PO2=1.0, one green means PO2=1.1 and one red means PO2=0.9. Multiple red or green flashes indicate 0.1 step from PO2=1.0 in each direction, so three green flashes means 1.3 whilst three red flashes means 0.7. If the PO2 is more than 0.5 away from 1.0, the intensity of the LEDs increases. And last, if the PO2 hits 0.2 or lower, the LEDs become very bright and flashes constantly red, the HUD “alarm” for very low PO2.

The Predator
The main electronic component of the JJ CCR is the Shearwater Predator handset. This is the puppy that runs the show, holds your setpoint and gives you all the vital information. It’s quite advanced, to the extent where you actually use bluetooth technology to transfer data to and from the Predator.

The Predator is of course not a JJ product, but it has been branded with a JJ-logo, and the firmware is adapted so it shows JJ-logo on startup.
The computer is very popular with several RB divers, and comes both in hardwired, fischer-connected and standalone versions - the one on the JJ is hardwired as it is a setpoint controller as well as a monitoring device.
In default mode the computer shows the PO2 value of all three O2 cells. During the calibration it also shows the millivolt value of all three cells. During diving it also shows current depth, dive time, stop depth (if mandatory stops are necessary) and stop time. On the bottom it shows current mode (CC or OC), diluent mix, remaining NDL time and TTS (Time To Surface). With newer firmware versions you are able to partially adjust color schemes.
The Predator by default runs with a Bühlmann decompression algorithm. You can adjust the gradient factors as desired, it’s set to 30/85 by default. Shearwater has also released support for VPM algorithm, which can be purchased as an unlock code from Shearwater dealers. You need to have firmware version v42 or higher in order to support VPM. This will also enable you to use VPM+GF which allows you to set a high gradient factor in order to extend the last stops to add conservatism. The high GF setting defines (as a percentage) how close to the M-value (supersaturation limit) you want to be when surfacing.
Calibration is done from the Predator and is fully automatic, you just open the mouthpiece (into CC mode) and choose “calibrate” in the Predator menu. This will trigger the solenoid to start a constant O2 feed onto the cells, it keeps going until the millivolt is stable and then calibrates the PO2 to the set value (0.98 by default). Quickly pressing the HUD button on the head three times after this will also calibrate the HUD.
The Scrubber
In order to remove the CO2 from your loop, the JJ comes standard with an axial scrubber. This holds 2,3kg of Sofnolime 797 (factory recommendation) and allows for 180 minutes @ 40m in accordance with the CE testing, 150 minutes @ 100m. The radial scrubber holds 3.05kg of Sofnolime 797 and provides longer runtimes.

The scrubber has a plastic housing with perforated “grills” top and bottom, in addition to hydrophobic filterscrims which goes inside. These are reusable and normally only replaced if you loose one.
After filling you screw the bottom grill back on (according to guidelines) and the head is then screwed on the top before the assembly goes into the main canister of the rebreather. It’s then sealed with a double barrel o-ring seal and held in place with a push-button that pops into a hole in the canister. In order to remove it again, the button needs to be pressed while pulling the assembly back out by the nylon handle on top.

The hoses
The JJ comes with miflex hoses for all low pressure connections and rubber hoses for the two high pressure connections to the SPGs.

The default configuration, when using inverted tanks, is to have the Apeks US 4 (standard intermediate pressure) from the diluent tank feeding the HP hose for the SPG, and then a LP miflex hose goes up between the canister and the wing. This in turn is connected to a 1-3 LP manifold / distribution block which feeds the BOV, the ADV and the wing. In addition there’s an 10 bar OPV on the first stage.
From the O2 side there’s another Apeks US4 feeding the HP hose to the SPG, and two miflex LP hoses going to the O2 MAV and the solenoid. There’s also a 7.5 bar OPV on the first stage.
The BOV
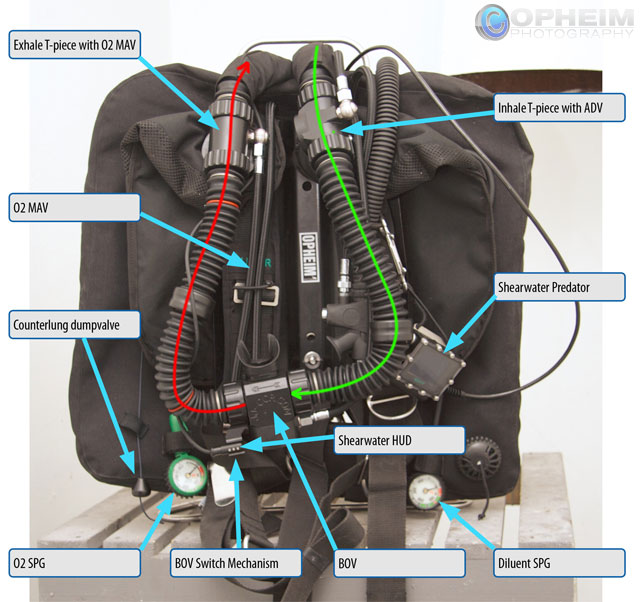
The JJ BOV is a very compact unit which allows you to easily switch from CC to OC mode. It’s based on a Scubapro 2nd stage. The mechanism for switching modes is integrated with the HUD holder, if the HUD is up (and thereby visible by the diver), it’s in CC mode. When turned forward/down the HUD disappears from the field of vision, and the BOV is in OC mode.

BOV is in open-circuit mode when the HUD is "hidden" behind the loop, and in closed-circuit when visible above the loop.
The O2 MAV
On the divers right side you find the O2 MAV. This gets oxygen from the O2 tank and feeds it into the right side T-piece (exhale side). You can also disconnect the feed from the O2 tank, swivel the inlet 180 degrees and connect a feed from any other gas source in order to add for instance diluent or offboard O2. The connection is a standard nipple as found on drysuits and wings.

The addition is very accurate and pressure dependant, ie if you press it lightly, it adds very small amounts, if you press it hard it adds a lot.
If you order the JJ with the optional diluent MAV, it’s exactly the same device as for O2 but placed on the left side feeding into the left T-piece (inhale).
The counterlungs
One of the most admired features of the JJ are the counterlungs. These are backmounted and perform exceptionally well, providing a low WOB. The T-pieces come up just over the shoulders on the diver, allowing for a very functional ADV on the left side with the inhale counterlung. The T-piece on the right side contains a watertrap to prohibit water from entering the scrubber, and there’s a dumpvalve / OPV on the lower right side.

The outside
As it’s a complete package, the JJ is delivered with a wing, steel backplate and harness. From the normal pictures it’s easy to mistake the harness for a one-piece version, when in fact it is not. The harness comes with light padding, a lot of d-rings and an adjustment system in order to ease getting in and out of the kit. Personally I have swapped this for my standard Halcyon harness.

My modfications
I haven’t done any major modifications to my unit, but the ones I have done are worth mentioning in case anyone would like to do the same.

"Modified" unit as I normally dive it, with Halcyon wing&harness, de-inverted tanks, Apeks Tek3 regs with Halcyon SPGs.
First off I normally dive with my tanks deinverted, both 3L and 7L steel. This of course means moving around on the hoses. I have also swapped out the first stages with two Apeks Tek3 in order to clean up the hose routing in a deinverted configuration. BE AWARE: The original Apeks US4 first stages are chosen for a reason. They are unsealed, which means they differ from most other Apeks first stages like the FST, FSR, Tek3 or DS4 which are common in OC environments. The major difference here is that the sealed versions have a creeping IP when descending, so you do NOT have a steady 7.0 bar IP above ambient if that is what you have set in surface pressure. According to my research on the topic, the creep is pretty linear, adding 0.2 bar per 10m depth, so 7.0 at surface gives 8.0 bar above ambient pressure at 50m depth. Since the solenoid is a low power model, it does not appreciate this rise in IP, as this will consume a lot more power. I have been unable to find out wether it actually will be damaged, so be warned.
In order to overcome this you can of course remove the environmental seal from a standard Tek3, but that is not recommended by Apeks.

The other stuff I’ve done is basically just replace the harness with a one-piece webbing from Halcyon, and I also use a standard Halcyon Evolve 40 wing which I have modified with a small “loop” to hold the dump string from the counterlung on the right side, similar to that found on the original wing.
I have also put the Predator on a bungee mount, which can hardly be justified as a rebreather modification.
The Software
Shearwater has software for both Mac and Windows computers allowing for firmware updates and dive log transfers to be performed via bluetooth. These are made in Adobe Air, and perform well. They are pretty simple and do not allow for very much creativity, but they do the job. The dive log shows voltages, PP of N2, He and O2, depth, time and temperature. You can also add data for location, buddy, comfortlevel, gear configuration and some other stuff.

(1) See JJ-CCR for details, certification reports and test results from Qinetiq
(2) As of May 2012, according to package descriptions here: JJ-CCR Rebreather Packages
(3) As of May 2012, according to Dave Thompson who is affiliated with JJ as the sole IT, mentioned here: http://www.ccrexplorers.com/showthread.php?p=126758#post126758
DISCLAIMER:
This teardown is provided as-is, and the author can not be held responsible for any errors, typos or misleading information. Any modifications mentioned here are not recommended by the manufacturer, and could potentially damage the unit, rendering it lethal. Don’t say I didn’t warn you.
And of course all the standard stuff - the unit should not be dived without proper training (provided by IART). Diving without proper training could kill you and all sorts of shitty stuff.
Safe diving.
Introduction
From an owners perspective
The JJ-CCR has been designed and tested since 2006 with more than 2000 operating hours under water in different locations around the world. In 2009 the unit was tested to the EN14143:2003 standard and in 2011 was rewarded with the official CE certification for diving depths of 40msw and 100msw.(1)
My unit is a non-CE version as I purchased it outside the EU. This was done intentionally as the BOV did not hold CE certification at the time of purchase. The BOV still does not hold CE certification, and is currently only available for purchase in the international edition.(2) This teardown is done with the BOV, unfortunately I didn’t have a DSV available for the photos.
The main differences from my unit to the CE unit is that the latter is shipped including 3-litre steel tanks, there’s a DSV instead of the BOV and the O2-side has M26 valve / regulator. Other than that, it’s the same unit.
JJ has made it easy to purchase the unit. You basically pick your edition (international with BOV or CE with DSV. If you choose the international edition, you have the option of buying a “light” edition, which just means “delivered without tanks”.
When you buy an Audi or BMW, you have litteraly hundreds of options and accessories. With the JJ, not so much. You can add a manual addition valve for the diluent side (O2 is standard), you can add a secondary Shearwater Predator computer (standalone) and you can choose the radial scrubber in addition to the standard axial. The radial scrubber holds 3.05kg as opposed to the axial which holds 2.3kg of Sofnolime. That’s it.
The JJ CCR has been very popular in Europe and Asia over the last couple of years, and according to my latest information, there is currently more than 300 units in use worldwide.(3) The unit is marketed as the “4x4 of rebreathers”, and sets out to be a simple, robust, adaptable and flexible rebreather when it comes to configuration. Suitable from lightweight recreational to the most demanding technical dives.
Let’s move on to a full teardown of the unit.
What’s in the box
The JJ is delivered in a crate, excellent for shipping or airtravel. Inside you’ll find the complete unit, fully assembled.
The unit comes complete with the aluminum body, stainless steel stand, head with electronics (hardwired Shearwater Predator and Shearwater HUD), loop with BOV (or DSV if buying CE unit), Apeks US4 1.stages, complete kit of hoses (miflex on LP, rubber on HP) and manifold, SPGs, backmounted counterlungs, wing, backplate with harness and the scrubber canister with two filter scrims. If ordered with tanks, you’ll get two 3L steel tanks with AP inline valves.
Original configuration with the standard wing, harness, backplate, regs, inverted tanks and all.
Dimensions
The canister itself is 43 cm high with a diameter of 18 cm. The rails and trimweight tubes comes in addition to this. The stand adds another 15 cm to the height. Then you put the handle on top, bringing the total height up to 67 cm when the handle is fully extracted.
Complete with a wing, backplate, harness, hoses and 3L steel tanks, with a full scrubber and 4kg leadrods in the canister tubes, the total weight ready-to-dive is around 37 kg.
The canister
The canister is made of aluminum, and the base has two delrin spacers that allows the stainless steel stand to be attached without issues with galvanic corrosion. This was not so on the early units, but has been rectified by JJ since then.
On the “backplate-side” of the canister, there are two tubes which can be used for trimweights. Users have come up with different solutions here, I myself had two custom lead rods fitted, coated with Plasti-DIP. They clock in at just over 4kg (total) and are perfect. The handle is screwed into these tubes, acting as covers.
On the outside of the canister, there are railings allowing you to fit up to four tanks to the unit, actually up to 12L steel tanks. This flexibility is one of the absolute pros of the unit. I normally dive with either 3L steel or 7L steel tanks, but have also tested it with 3L and S40 alu tanks. Some (many) divers will discover that having a 0.85L suitgas tank on the backplate (wreck mount style) may interfere with the inhale counterlung. The railings on the canister allows for the suitgas to be secured on the back instead.
From the factory, the unit is set up with inverted tanks, I have later switched around on the hoses to fascilitate deinverting the tanks in order to get the valves upright. This can actually be done without replacing any hoses (just by swapping where they go), but if you want it absolutely perfect, you may want to swap one or two.
7L steel de-inverted - 3L steel inverted - 3L steel de-inverted
Inside the electronics
On top of the head you’ll find the O2 inlet, a standard 9/16” M regulator connection. Opposite of this you find the piezo-button for the HUD. A tap turns it on, another turns it off. Three rapid taps in under a second calibrates it.
Dead center is the inhale hose, the one close to the edge is the exhale one. These have different diameter to avoid possibility of connecting them wrong. The other ends (which connect to the T-pieces) are threaded oppositely for the same reason.
On the sides of the exhale hose you’ll find the HUD cable and the Predator cable. Both of these are hardwired to the unit and can’t be removed (easily anyway).
Opposite of the exhale hose you’ll find the battery compartment. This is fastened with 10 screws which must be removed to gain access. In the compartment, which is sealed from everything else and is not in contact with the loop, you’ll find two 6V CR-P2 batteries connected in parallel which run the solenoid. In addition you’l find a 3,6V SAFT14500 battery which run the HUD. This is the same battery that you’ll find in the Shearwater Predator handset. The SAFT should outlive the two CR-P2’s by a mile, but JJ recommends swapping them all at the same time, normally they should all last at least 6-12 months. The two CR-P2’s are monitored by the Shearwater Predator which will give a “Low Battery EXT” warning if they need to be replaced.
Removing the head from the unit, you expose the interiors. The canister itself contains nothing, but underneath the head you’ll find the solenoid, three O2 cells and their connectors. The solenoid is a small, low power version. It is designed to have a fault mode in closed position if if fails. Due to this low power consumption, the intermediate pressure for the solenoid is set to 7-7.5 bar. (In contrast to the diluent side which is the normal 9-10 bar).
The cells used are Vandagraph-manufactured R17JJ-CCR cells which have proven to be very stable and deliver good response times.
Inside you’ll also see the sealing on the potted area for the electronics / circuit boards. This is not accessible for the user.
The HUD
The HUD on the JJ CCR is a Shearwater model. This is an “active” HUD, meaning it gives you the actual PO2, not just a “you’re good” or “you’re screwed” signal. The three LEDs indicate each individual cell, and can flash red, orange or green. One orange flash means PO2=1.0, one green means PO2=1.1 and one red means PO2=0.9. Multiple red or green flashes indicate 0.1 step from PO2=1.0 in each direction, so three green flashes means 1.3 whilst three red flashes means 0.7. If the PO2 is more than 0.5 away from 1.0, the intensity of the LEDs increases. And last, if the PO2 hits 0.2 or lower, the LEDs become very bright and flashes constantly red, the HUD “alarm” for very low PO2.
The Predator
The main electronic component of the JJ CCR is the Shearwater Predator handset. This is the puppy that runs the show, holds your setpoint and gives you all the vital information. It’s quite advanced, to the extent where you actually use bluetooth technology to transfer data to and from the Predator.
The Predator is of course not a JJ product, but it has been branded with a JJ-logo, and the firmware is adapted so it shows JJ-logo on startup.
The computer is very popular with several RB divers, and comes both in hardwired, fischer-connected and standalone versions - the one on the JJ is hardwired as it is a setpoint controller as well as a monitoring device.
In default mode the computer shows the PO2 value of all three O2 cells. During the calibration it also shows the millivolt value of all three cells. During diving it also shows current depth, dive time, stop depth (if mandatory stops are necessary) and stop time. On the bottom it shows current mode (CC or OC), diluent mix, remaining NDL time and TTS (Time To Surface). With newer firmware versions you are able to partially adjust color schemes.
The Predator by default runs with a Bühlmann decompression algorithm. You can adjust the gradient factors as desired, it’s set to 30/85 by default. Shearwater has also released support for VPM algorithm, which can be purchased as an unlock code from Shearwater dealers. You need to have firmware version v42 or higher in order to support VPM. This will also enable you to use VPM+GF which allows you to set a high gradient factor in order to extend the last stops to add conservatism. The high GF setting defines (as a percentage) how close to the M-value (supersaturation limit) you want to be when surfacing.
Calibration is done from the Predator and is fully automatic, you just open the mouthpiece (into CC mode) and choose “calibrate” in the Predator menu. This will trigger the solenoid to start a constant O2 feed onto the cells, it keeps going until the millivolt is stable and then calibrates the PO2 to the set value (0.98 by default). Quickly pressing the HUD button on the head three times after this will also calibrate the HUD.
The Scrubber
In order to remove the CO2 from your loop, the JJ comes standard with an axial scrubber. This holds 2,3kg of Sofnolime 797 (factory recommendation) and allows for 180 minutes @ 40m in accordance with the CE testing, 150 minutes @ 100m. The radial scrubber holds 3.05kg of Sofnolime 797 and provides longer runtimes.
The scrubber has a plastic housing with perforated “grills” top and bottom, in addition to hydrophobic filterscrims which goes inside. These are reusable and normally only replaced if you loose one.
After filling you screw the bottom grill back on (according to guidelines) and the head is then screwed on the top before the assembly goes into the main canister of the rebreather. It’s then sealed with a double barrel o-ring seal and held in place with a push-button that pops into a hole in the canister. In order to remove it again, the button needs to be pressed while pulling the assembly back out by the nylon handle on top.
The hoses
The JJ comes with miflex hoses for all low pressure connections and rubber hoses for the two high pressure connections to the SPGs.
The default configuration, when using inverted tanks, is to have the Apeks US 4 (standard intermediate pressure) from the diluent tank feeding the HP hose for the SPG, and then a LP miflex hose goes up between the canister and the wing. This in turn is connected to a 1-3 LP manifold / distribution block which feeds the BOV, the ADV and the wing. In addition there’s an 10 bar OPV on the first stage.
From the O2 side there’s another Apeks US4 feeding the HP hose to the SPG, and two miflex LP hoses going to the O2 MAV and the solenoid. There’s also a 7.5 bar OPV on the first stage.
The BOV
The JJ BOV is a very compact unit which allows you to easily switch from CC to OC mode. It’s based on a Scubapro 2nd stage. The mechanism for switching modes is integrated with the HUD holder, if the HUD is up (and thereby visible by the diver), it’s in CC mode. When turned forward/down the HUD disappears from the field of vision, and the BOV is in OC mode.
BOV is in open-circuit mode when the HUD is "hidden" behind the loop, and in closed-circuit when visible above the loop.
The O2 MAV
On the divers right side you find the O2 MAV. This gets oxygen from the O2 tank and feeds it into the right side T-piece (exhale side). You can also disconnect the feed from the O2 tank, swivel the inlet 180 degrees and connect a feed from any other gas source in order to add for instance diluent or offboard O2. The connection is a standard nipple as found on drysuits and wings.
The addition is very accurate and pressure dependant, ie if you press it lightly, it adds very small amounts, if you press it hard it adds a lot.
If you order the JJ with the optional diluent MAV, it’s exactly the same device as for O2 but placed on the left side feeding into the left T-piece (inhale).
The counterlungs
One of the most admired features of the JJ are the counterlungs. These are backmounted and perform exceptionally well, providing a low WOB. The T-pieces come up just over the shoulders on the diver, allowing for a very functional ADV on the left side with the inhale counterlung. The T-piece on the right side contains a watertrap to prohibit water from entering the scrubber, and there’s a dumpvalve / OPV on the lower right side.
The outside
As it’s a complete package, the JJ is delivered with a wing, steel backplate and harness. From the normal pictures it’s easy to mistake the harness for a one-piece version, when in fact it is not. The harness comes with light padding, a lot of d-rings and an adjustment system in order to ease getting in and out of the kit. Personally I have swapped this for my standard Halcyon harness.
My modfications
I haven’t done any major modifications to my unit, but the ones I have done are worth mentioning in case anyone would like to do the same.
"Modified" unit as I normally dive it, with Halcyon wing&harness, de-inverted tanks, Apeks Tek3 regs with Halcyon SPGs.
First off I normally dive with my tanks deinverted, both 3L and 7L steel. This of course means moving around on the hoses. I have also swapped out the first stages with two Apeks Tek3 in order to clean up the hose routing in a deinverted configuration. BE AWARE: The original Apeks US4 first stages are chosen for a reason. They are unsealed, which means they differ from most other Apeks first stages like the FST, FSR, Tek3 or DS4 which are common in OC environments. The major difference here is that the sealed versions have a creeping IP when descending, so you do NOT have a steady 7.0 bar IP above ambient if that is what you have set in surface pressure. According to my research on the topic, the creep is pretty linear, adding 0.2 bar per 10m depth, so 7.0 at surface gives 8.0 bar above ambient pressure at 50m depth. Since the solenoid is a low power model, it does not appreciate this rise in IP, as this will consume a lot more power. I have been unable to find out wether it actually will be damaged, so be warned.
In order to overcome this you can of course remove the environmental seal from a standard Tek3, but that is not recommended by Apeks.
The other stuff I’ve done is basically just replace the harness with a one-piece webbing from Halcyon, and I also use a standard Halcyon Evolve 40 wing which I have modified with a small “loop” to hold the dump string from the counterlung on the right side, similar to that found on the original wing.
I have also put the Predator on a bungee mount, which can hardly be justified as a rebreather modification.
The Software
Shearwater has software for both Mac and Windows computers allowing for firmware updates and dive log transfers to be performed via bluetooth. These are made in Adobe Air, and perform well. They are pretty simple and do not allow for very much creativity, but they do the job. The dive log shows voltages, PP of N2, He and O2, depth, time and temperature. You can also add data for location, buddy, comfortlevel, gear configuration and some other stuff.
(1) See JJ-CCR for details, certification reports and test results from Qinetiq
(2) As of May 2012, according to package descriptions here: JJ-CCR Rebreather Packages
(3) As of May 2012, according to Dave Thompson who is affiliated with JJ as the sole IT, mentioned here: http://www.ccrexplorers.com/showthread.php?p=126758#post126758
DISCLAIMER:
This teardown is provided as-is, and the author can not be held responsible for any errors, typos or misleading information. Any modifications mentioned here are not recommended by the manufacturer, and could potentially damage the unit, rendering it lethal. Don’t say I didn’t warn you.
And of course all the standard stuff - the unit should not be dived without proper training (provided by IART). Diving without proper training could kill you and all sorts of shitty stuff.
Safe diving.
Last edited:


