

Garspeed
Wreck ferret
I have been diving my Inspiration Vision in a G-Box for the best part of a year now. Some of you will be aware of my previous set up using an Alibox (http://www.ccrexplorers.com/showthread.php?t=14709&highlight=) which I really liked but when I was planning a trip to Truk Lagoon last Oct I needed to slim down the weight and make sure it was fit to travel. I started by changing out my thick steel backplate for a lightweight ABS one but when I got the chance of a second hand G-Box I jumped at it as I was very impressed with the quality I had seen from my buddies ones. I set my unit up in the G-Box very much the same as I had done so in the Alibox with same hose routings, harness set up etc. Having just returned from a few weeks diving the WW2 wrecks in Palau (separate post to come on wreck surveys for Rod MadDonalds's new "Dive Palau" book due out end of year) I now realise that my unit was pretty "fat" and needed further attention. (note - it does not help to be diving with a buddy on a Pathfinder (mini - Meg) and twin 2 litre cylinders who has the profile of a single 12!!!). My plan was to try and remove the clutter from the rear of the G-Box and also remove the spacers I had between back plate and box which were required for my back lungs to work well on surface with wing inflated. For those that don't know, RMCL's are fine but can suffer from lack of room to expand fully when on surface with wing inflated, hence requirement to insert spacers to allow cylinders to move further back and therefore give more space to wing and lungs.
The results of all of this can be seen below - hope you like it!
Step 1 - Getting the old Inspo manifold to fit the G-Box
Most people simply zip tie the manifold in place, as I have done for the last year but being an engineer this goes against the grain so needed to be improved. Use bottom backplate mounting hole for one manifold screw and drill second screw hole as required (note use of rubber to try and avoid corrosion issues between alloy and stainless steel)


Note - "Narked at 90" delrin hose protector fitted to solenoid O2 feed and similar fitted on head to prevent any crap getting into solenoid - money well spent!
Step 2 - Fix handle
Added old Alibox handle to G-Box which when fitted at angle does really nicely


Step 3 - Sort out hose routings
Lots of people have issues with reg hose routings on the G-Box. Mine was solved by having manifold hoses going from inside box to outside and then the HP SPG hoses running up the outside of the box. In this way the regs can be sited pretty much as they should be in standard yellow box


Bungee loops on base are used for carrying spare blob when diving but are also very handy for fixing around reg din wheels when no cylinders attached. In this way the unit can be transported without the regs clanging as they bounce off of the base frame which is both annoying and unneccessary
Step 4 - Get suit inflate and torch canister off of back of unit and onto side of back plate as I used to have in good old open circuit trimix days
On right hand side of back plate I have home made side mount strap at top of plate, webbing for torch canister and then bungee loop for torch at bottom

With torch canister fitted it looks like this

On left hand side of back plate I have home made side mount strap at top of plate, webbing for suit inflate tin and then bungee loop for suit inflate tin at bottom
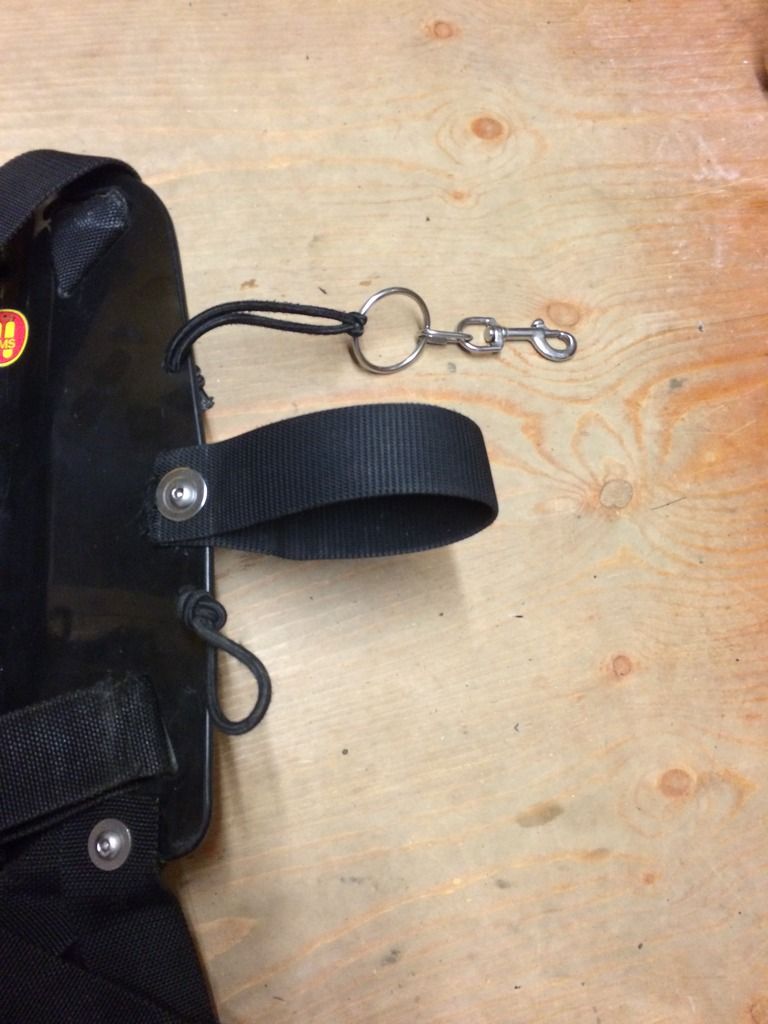
With suit inflate tin fitted it looks like this

Whole harness looks like this and includes home made butt plate for side mounting bailout tins made from old harness webbing

Step 5 - Sort out onboard tins
I am not a fan of the cylinder bags that the guys using G-Boxes use as I have multiple tins that I swap back and forth and I do not want to have to buy bags for them all. I have tried using the standard clamps on bare cylinders but they mark the cylinders and they still slip due to lack of grip. My answer for this is to add a piece of rubber hose to the edges of the clamp as follows to protect the cylinder and give some additional grip on the cylinder to prevent slippage

I have tried running single clamps but found there is too much movement of the cylinder so prefer to run double clamps. As I have no longer a need to leave space to allow suit inflate and torch canister to be fitted behind on board tins, I can therefore move the mounting position back to give plenty of space for back plate mounted suit inflate and torch, lungs to expand and wing. To do this I chose to mount in central holes and had to drill new top mounting hole for top cylinder clamp as required

This gives me 4 mounting straps for my two on board cylinders to make things very solid once fitted
Note old weight belt being used for canister retainer inside box

Step 6 - Sort out lungs
As you may know, I have made several different external lung bags using AP fittings and internal bags. After my Truk visit I realised that my current versions had too much volume and also allowed gas to migrate too far down my back if diving inverted, as we often are inside a silty ship wreck. I therefore modified my lungs to remove the bottom corner, thus making them smaller and also retaining gas closer to the t-pieces where you want and need it

I am really please with the end result which forces minimum loop volume, keeps the gas where I need it around the t-pieces but also requires much less space down my back and around the back plate where my suit inflate and torch canister are now positioned. As per previous, I use AP MAV's which are excellent quality and great value for money, I still have the OPV in place on the exhale lung but run a string to the side which I can easily reach. I also fitted a standard BCD pull dump valve on the inhale lung with a short dump chord. This valve is only used for maintenance and allows very easy water flushing and disinfecting of lungs without having to remove them from the unit and I can highly recommend it's position for the added value of these functions.


Step 7 - Sort out front hoses and MAV's
My front hose routings and MAV's are set up as per my Alibox with SPG and MAV feed and return on either side. I then have my offboard BOV feed on the DIL side (see male gas connect) which loops round the back of my neck via a myflex hose then comes round loop to feed BOV from right hand side. I have also included a feed direct from the O2 manifold down towards my O2 MAV (see female gas connect) and this can be connected across my chest to the male gas connect if I have bailed out onto open circuit, I reach 6m and I want to use what is left in my onboard O2 tin which I can now access using my open circuit BOV


Final Result


Thanks to 20 wreck dives in Palau my unit is looking a little second hand, as you can see from the scratches and rust on the harness. I think that this adds character but then, that's just me.
Hope you like my updated build. Happy to receive any comments or questions on same
Cheers
Gar
The results of all of this can be seen below - hope you like it!
Step 1 - Getting the old Inspo manifold to fit the G-Box
Most people simply zip tie the manifold in place, as I have done for the last year but being an engineer this goes against the grain so needed to be improved. Use bottom backplate mounting hole for one manifold screw and drill second screw hole as required (note use of rubber to try and avoid corrosion issues between alloy and stainless steel)


Note - "Narked at 90" delrin hose protector fitted to solenoid O2 feed and similar fitted on head to prevent any crap getting into solenoid - money well spent!
Step 2 - Fix handle
Added old Alibox handle to G-Box which when fitted at angle does really nicely


Step 3 - Sort out hose routings
Lots of people have issues with reg hose routings on the G-Box. Mine was solved by having manifold hoses going from inside box to outside and then the HP SPG hoses running up the outside of the box. In this way the regs can be sited pretty much as they should be in standard yellow box


Bungee loops on base are used for carrying spare blob when diving but are also very handy for fixing around reg din wheels when no cylinders attached. In this way the unit can be transported without the regs clanging as they bounce off of the base frame which is both annoying and unneccessary
Step 4 - Get suit inflate and torch canister off of back of unit and onto side of back plate as I used to have in good old open circuit trimix days
On right hand side of back plate I have home made side mount strap at top of plate, webbing for torch canister and then bungee loop for torch at bottom

With torch canister fitted it looks like this

On left hand side of back plate I have home made side mount strap at top of plate, webbing for suit inflate tin and then bungee loop for suit inflate tin at bottom

With suit inflate tin fitted it looks like this

Whole harness looks like this and includes home made butt plate for side mounting bailout tins made from old harness webbing

Step 5 - Sort out onboard tins
I am not a fan of the cylinder bags that the guys using G-Boxes use as I have multiple tins that I swap back and forth and I do not want to have to buy bags for them all. I have tried using the standard clamps on bare cylinders but they mark the cylinders and they still slip due to lack of grip. My answer for this is to add a piece of rubber hose to the edges of the clamp as follows to protect the cylinder and give some additional grip on the cylinder to prevent slippage

I have tried running single clamps but found there is too much movement of the cylinder so prefer to run double clamps. As I have no longer a need to leave space to allow suit inflate and torch canister to be fitted behind on board tins, I can therefore move the mounting position back to give plenty of space for back plate mounted suit inflate and torch, lungs to expand and wing. To do this I chose to mount in central holes and had to drill new top mounting hole for top cylinder clamp as required

This gives me 4 mounting straps for my two on board cylinders to make things very solid once fitted
Note old weight belt being used for canister retainer inside box

Step 6 - Sort out lungs
As you may know, I have made several different external lung bags using AP fittings and internal bags. After my Truk visit I realised that my current versions had too much volume and also allowed gas to migrate too far down my back if diving inverted, as we often are inside a silty ship wreck. I therefore modified my lungs to remove the bottom corner, thus making them smaller and also retaining gas closer to the t-pieces where you want and need it

I am really please with the end result which forces minimum loop volume, keeps the gas where I need it around the t-pieces but also requires much less space down my back and around the back plate where my suit inflate and torch canister are now positioned. As per previous, I use AP MAV's which are excellent quality and great value for money, I still have the OPV in place on the exhale lung but run a string to the side which I can easily reach. I also fitted a standard BCD pull dump valve on the inhale lung with a short dump chord. This valve is only used for maintenance and allows very easy water flushing and disinfecting of lungs without having to remove them from the unit and I can highly recommend it's position for the added value of these functions.


Step 7 - Sort out front hoses and MAV's
My front hose routings and MAV's are set up as per my Alibox with SPG and MAV feed and return on either side. I then have my offboard BOV feed on the DIL side (see male gas connect) which loops round the back of my neck via a myflex hose then comes round loop to feed BOV from right hand side. I have also included a feed direct from the O2 manifold down towards my O2 MAV (see female gas connect) and this can be connected across my chest to the male gas connect if I have bailed out onto open circuit, I reach 6m and I want to use what is left in my onboard O2 tin which I can now access using my open circuit BOV


Final Result


Thanks to 20 wreck dives in Palau my unit is looking a little second hand, as you can see from the scratches and rust on the harness. I think that this adds character but then, that's just me.
Hope you like my updated build. Happy to receive any comments or questions on same
Cheers
Gar
Last edited:


